


XX. Etude de cas - version 2▲
Nous présentons maintenant la version finale de notre application :

Le nouveau projet Netbeans [pam-02] est obtenue par recopie du projet [pam-01] :
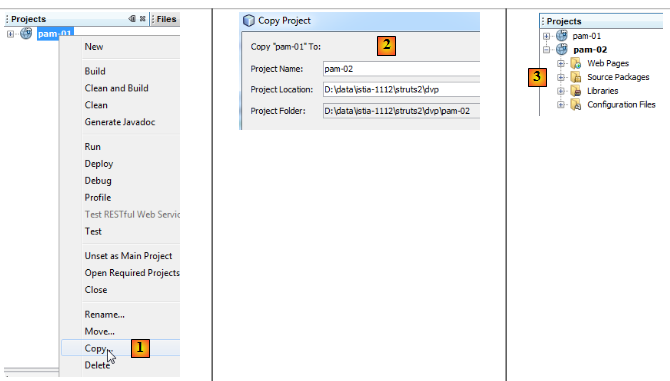
- en [1], on copie le nouveau projet
- en [2], on nomme le nouveau projet [pam-02] et on précise son dossier
- en [3], le nouveau projet [pam-02]
Pour " brancher " la vraie couche [metier] sur la couche web que nous avons construite, il faut faire trois choses :
- supprimer la couche [metier] simulée que nous avions créée
- configurer Spring pour qu'il instancie la vraie couche [metier] qui se trouve dans l'archive [pam-spring-metier-dao-jpa-hibernate.jar].
- ajouter au projet toutes les archives nécessaires (Spring, Hibernate, Jpa, pilote Jdbc de MySQL).
Le fichier de configuration de Spring [WEB-INF/applicationContext.xml] devient le suivant :
2.
3.
4.
5.
6.
7.
8.
9.
10.
11.
12.
13.
14.
15.
16.
17.
18.
19.
20.
21.
22.
23.
24.
25.
26.
27.
28.
29.
30.
31.
32.
33.
34.
35.
36.
37.
38.
39.
40.
41.
42.
43.
44.
45.
46.
47.
48.
49.
50.
51.
52.
53.
54.
55.
<?xml version="1.0" encoding="UTF-8"?>
<beans xmlns="http://www.springframework.org/schema/beans" xmlns:xsi="http://www.w3.org/2001/XMLSchema-instance"
       xmlns:tx="http://www.springframework.org/schema/tx"
       xsi:schemaLocation="http://www.springframework.org/schema/beans http://www.springframework.org/schema/beans/spring-beans-2.0.xsd http://www.springframework.org/schema/tx http://www.springframework.org/schema/tx/spring-tx-2.0.xsd">

  <!-- couches applicatives -->

 <!-- web -->
  <bean id="config" class="web.Config" init-method="init">
    <property name="metier" ref="metier"/>
  </bean>
  <!-- métier -->
  <bean id="metier" class="metier.Metier">
    <property name="employeDao" ref="employeDao"/>
    <property name="cotisationDao" ref="cotisationDao"/>
  </bean>
  <!--  dao -->
  <bean id="employeDao" class="dao.EmployeDao" />
  <bean id="indemniteDao" class="dao.IndemniteDao" />
  <bean id="cotisationDao" class="dao.CotisationDao" />

  <!-- configuration JPA -->
  <bean id="entityManagerFactory" class="org.springframework.orm.jpa.LocalContainerEntityManagerFactoryBean">
    <property name="dataSource" ref="dataSource" />
    <property name="jpaVendorAdapter">
      <bean class="org.springframework.orm.jpa.vendor.HibernateJpaVendorAdapter">
        <property name="databasePlatform" value="org.hibernate.dialect.MySQL5InnoDBDialect" />
      </bean>
    </property>
    <property name="loadTimeWeaver">
      <bean class="org.springframework.instrument.classloading.InstrumentationLoadTimeWeaver" />
    </property>
  </bean>

  <!-- la source de donnéees DBCP -->
  <bean id="dataSource" class="org.apache.commons.dbcp.BasicDataSource" destroy-method="close">
    <property name="driverClassName" value="com.mysql.jdbc.Driver" />
    <property name="url" value="jdbc:mysql://localhost:3306/dbpam_hibernate" />
    <property name="username" value="root" />
    <property name="password" value="" />
  </bean>

  <!-- le gestionnaire de transactions -->
  <tx:annotation-driven transaction-manager="txManager" />
  <bean id="txManager" class="org.springframework.orm.jpa.JpaTransactionManager">
    <property name="entityManagerFactory" ref="entityManagerFactory" />
  </bean>

  <!-- traduction des exceptions -->
  <bean class="org.springframework.dao.annotation.PersistenceExceptionTranslationPostProcessor" />

  <!-- persistence -->
  <bean class="org.springframework.orm.jpa.support.PersistenceAnnotationBeanPostProcessor" />

</beans>
Les lignes 36-41 configurent l'accès à la base de données.
L'ajout des nouvelles bibliothèques (Spring, Hibernate, Jpa, pilote Jdbc de MySQL) se fait à partir du dossier [lib] [2]. On prend l'intégralité du dossier. Il y a plusieurs dizaines de fichiers .jar à ajouter [1] :
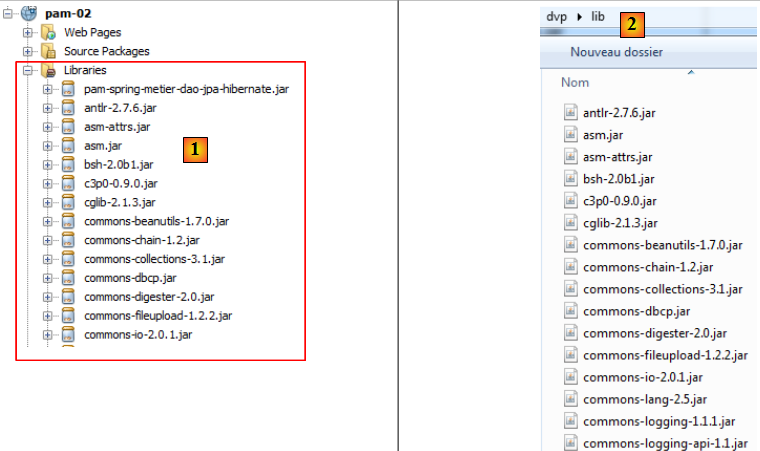
Il a été assez difficile de constituer cette bibliothèque car ces frameworks utilisent parfois les mêmes archives. Il faut alors supprimer les doublons. Ces fichiers ont été rassemblés dans le dossier [lib] [2] dans l'archive des exemples de ce document afin que le lecteur n'ait pas à reconstituer lui-même cette bibliothèque.
C'est tout. La nouvelle application [pam-02] va désormais travailler avec le SGBD. Voici une copie d'écran d'un calcul de salaire :

Cette fois-ci, le salaire calculé est le vrai salaire et non le salaire fictif de la version 1. Le lecteur est invité à tester la nouvelle application.
